
How to become a wedding photographer in 7 easy steps
An easy to follow step by step guide to get aspiring wedding photographers started. Wedding photography is all about capturing a couple’s special moment for
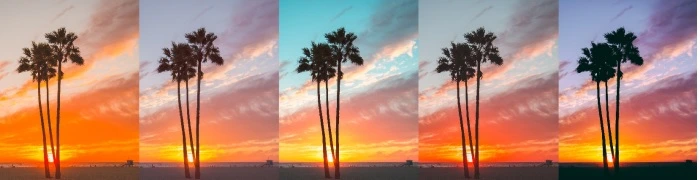
The period just before sunrise or sunset is often named “golden hour”, because of the soft and warm golden tones to the sky. Many photographers like to capture this time of day especially in portrait photography as it blurs imperfections, softens the overall image and creates a dreamy look.
If left unedited, these RAW images can seem flat and dull compared to what is seen with the naked eye. Luckily, Lightroom provides the required tools to bring these images to life provided that the original image isn’t too under or over exposed.
The below image is of Bryce Canyon taken at sunrise. This photo will be used to demonstrate the editing process. The same settings can be used for an image taken at sunset.
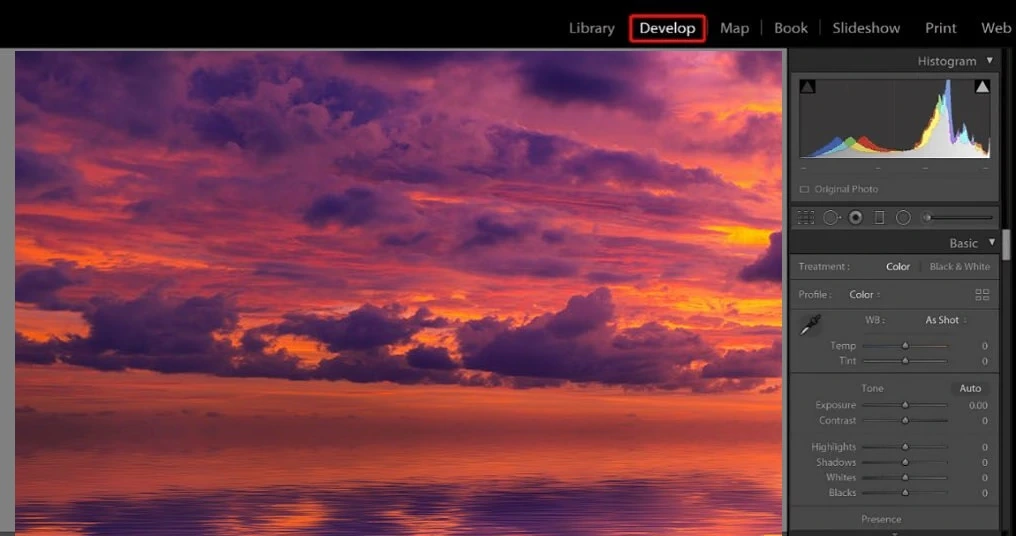
We are going to be using the “Develop” module in Lightroom. It can be found in the upper right hand corner, next to the “Library” module.
The necessary adjustments will have to be made to the following settings:
By making the above adjustments, it is clear that there is already an improvement from the original image.
Once the editing is completed in Step 1, the background (sky) and foreground (mountains and snow) will be edited separately to account for the different exposures.
Although the image is already more enhanced, the blue tones in the sky are looking unnatural and too artificial. The settings can be adjusted as per the below to correct this.
The other settings are left on default and no adjustments are made to them.
The below example is a comparison of the before and after images after the above adjustments were made.
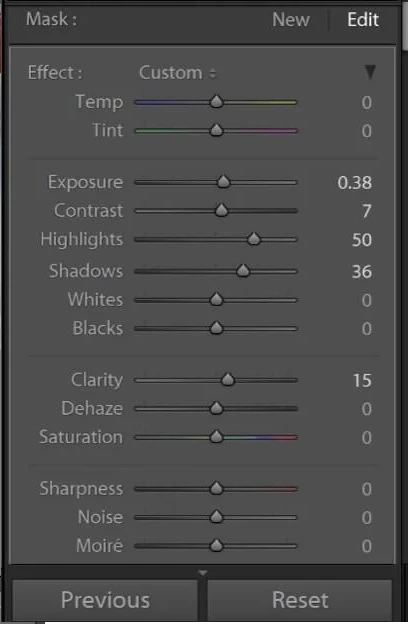
Using the Adjustment Brush/Mask tool to select the sky, the following adjustments need to be made in order to enhance the clouds in the sky more.
In order to view the masked areas, the “Show Selected Mask Overlay” option must be selected. This will also enable you to erase any areas that were selected by mistake. Below is an example of erasing an area (the blue mark in the upper left corner) for the purpose of this guide.
As an alternative, the “Graduated Filter” or a gradient mask can be used. This will depend on the user preference, however, the brush mask gives more control and flexibility than the gradient mask.
The Adjustment Brush/Mask tool can again be used to select the mountains as per the below example.
Make the below adjustments to enhance and brighten the area, for example:
The adjustments will brighten and enhance the mountains so that the eye is drawn to both the sky and the rock formations.
Cropping an image is used to improve the composition and framing so that the eye of the viewer is drawn to a specific area or to improve the overall aesthetic of the image.
The handle bars at the bottom right of the image is an unnecessary detail that detracts from the overall quality of the image. Once removed, the focus is automatically put onto the rest of the landscape without the distraction of the handle bars.
In order to adhere to the rule of thirds, a small portion of the sky was also cropped in order to keep the image balanced.
Once the image has been cropped to achieve the desired look, it can now be shared online or printed out as a hard copy.
It is clear from the before and after images that the editing has created more vibrance, clarity and definition, making the after image appear lifelike and almost three dimensional.
Lightroom makes it possible for photographers to capture the majestic look of the golden hour by means of some powerful editing tools.
When used correctly, a sunrise or sunset image can be enhanced in such a way that the viewer can have the experience of almost being at the physical location.
These settings and adjustments do not apply only to landscape images, but can be used on any image that has contrasting exposures.